> ## Documentation Index
> Fetch the complete documentation index at: https://zovi.mintlify.site/llms.txt
> Use this file to discover all available pages before exploring further.
# Configuring your client app
> Use App Builder to brand the Beauty Circle App your clients use, choose what appears in it, add languages, and publish your changes live in about a minute.
**App Builder** is where you shape the app your clients use. Open it from **App
Customisation** under **App Builder** in the sidebar. Everything here controls
**the Beauty Circle App**, your clinic's own branded client app: how it looks,
what's in it, and which languages it speaks. Your changes stay staged until you
publish them.
Your clients get the app both as a native app for iPhone and Android and as a web
app they can use straight from a browser and add to their home screen. App
Builder configures both at once, so you never set anything up twice.
 ## What App Builder controls
App Builder configures the app your clients install and open, not the dashboard
you're using. It has four tabs:
| Tab | What you set here |
| --------------------- | ------------------------------------------------- |
| **App Customisation** | Your brand and theme, plus app languages |
| **Treatments** | Which treatments appear and how they're presented |
| **Rewards** | Which rewards clients see |
| **Content** | Which blog articles and testimonials show up |
App Builder also has two full-page sections of its own: **Navigation**, where you
arrange the tabs clients move between, and **Notifications**, where you set the
push messages your app sends.
Skin concerns are no longer edited in App Builder. A concern appears in your app
as soon as a live treatment or retail product is tagged with it. See
[Concerns](/catalog/concerns).
## App Customisation
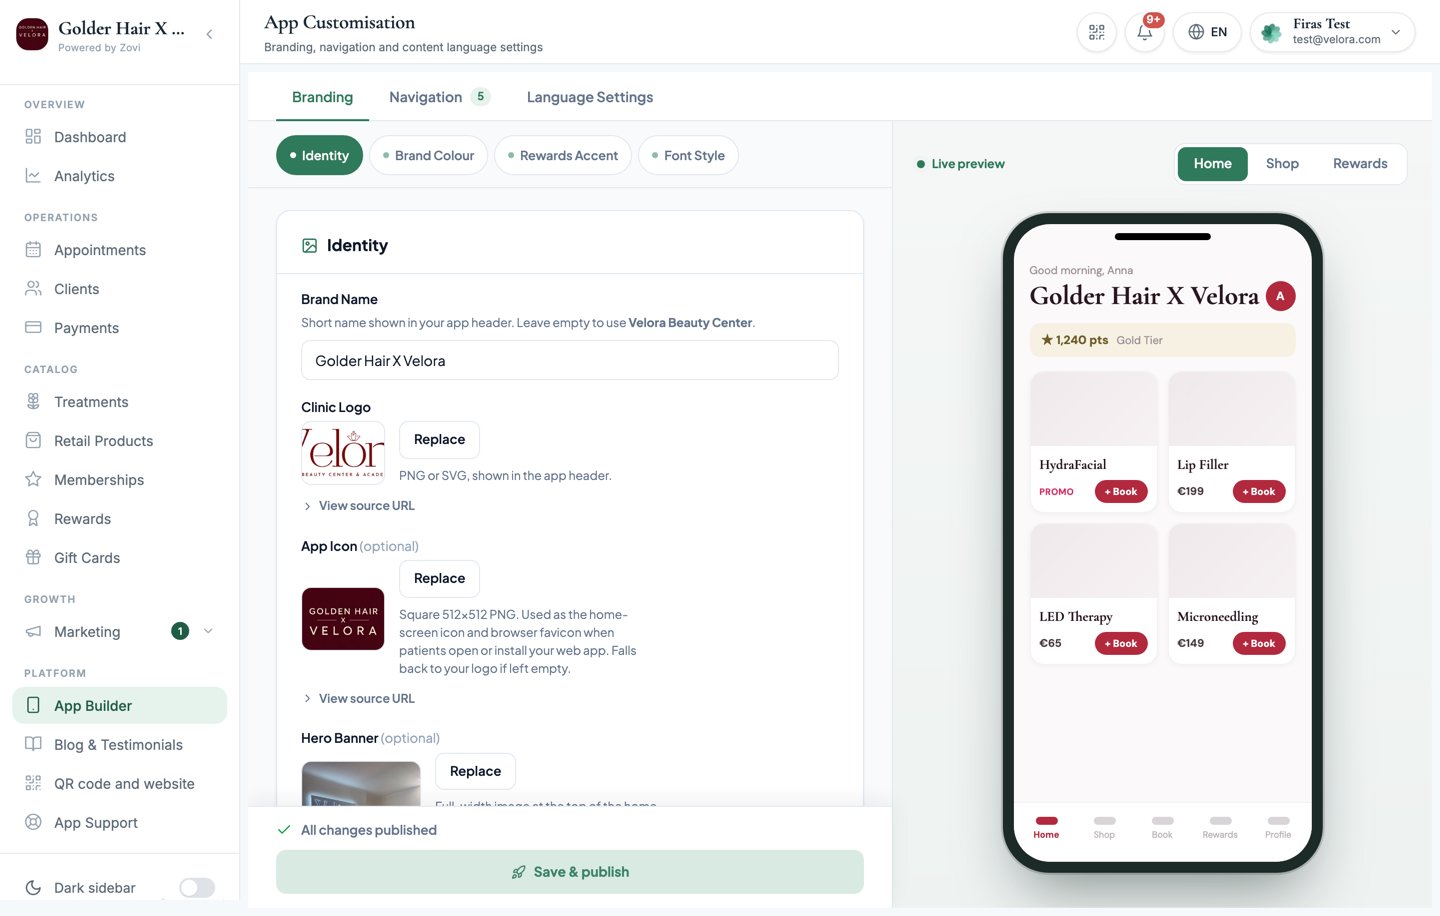
The **App Customisation** tab is your branding. As you change each field, the
**phone preview** on the side updates so you can see the app the way clients will:
* **Brand name**: the name shown throughout the app.
* **Logo**: your clinic logo.
* **App icon**: the icon clients see on their home screen.
* **Hero banner**: the headline image at the top of the app.
* **Primary color**: your main brand color, applied across the app.
* **Theme**: the overall look, shown live in the phone preview.
Keep an eye on the **phone preview** as you go. It's the fastest way to catch a
logo that's cropped awkwardly or a primary color that clashes before you publish.
## Choose what appears in the app
The **Treatments**, **Rewards**, and **Content** tabs decide what your clients
actually see. The items themselves are created elsewhere. App
Builder is where you choose which of them surface in the app and how they're
ordered.
* **Treatments**: control how your services appear to clients. Manage the
services themselves in [Treatments](/catalog/treatments).
* **Rewards**: choose which rewards clients can see. Build and edit rewards in
[Rewards](/loyalty/rewards).
* **Content**: choose which blog articles and testimonials appear. Create and
manage them in [Blog & testimonials](/content/blog-testimonials).
### Navigation
Use the **Navigation** editor to arrange how clients move around the app: the
sections they land on and the order they appear in. Sections hide themselves when
they have nothing to show, so a clinic with no retail products does not show an
empty Retail tab.
## App languages
Under **App Customisation** you'll find **App languages**. This is how your app
speaks to clients in their own language without you translating everything by
hand.
Turn on each language you want to support. Enabling a language
**auto-translates** your client-facing content into it.
Choose a **default content language**, the one used when a client's language
isn't one you've enabled.
Auto-translation covers your client-facing content so clients see your app in a
language they understand. Set the default to the language most of your clients
use.
## What your clients see
App Builder describes the settings. This is the result, so you know what a client
is actually looking at when they call you about it.
### Home
Your hero banner and brand colors, promo cards (the headline is the tap target,
and the fine print opens in its own dialog), and a closing block inviting them to
ask your [AI Advisor](/advisor/overview) if you have one. Clinics with the advisor
get a sparkles icon in place of search in the header.
### Shop
Shop is organised into tabs, and **each tab hides itself when it has nothing to
show**:
| Tab | Appears when |
| --------------------- | ------------------------------------------- |
| **Just For You** | Your AI Advisor is switched on |
| **Discover** | Always |
| **Browse by Concern** | Always. This is where concerns live in full |
| **Memberships** | You have at least one plan |
| **Treatments** | Always |
| **Retail** | You have retail products in stock |
**Discover** runs in this order: an advisor hero, then **Our Services**, what is
trending at your clinic, your referral programme, wellness reads, real results
from your own before and after work, a gift card banner, a treatment spotlight,
and a limited-time teaser.
**Our Services** is a menu of everything you sell, one row each: memberships,
individual treatments, retail products, rewards, and gift cards. Rows hide
themselves when they are empty, and each one uses your own first available photo
for that service.
### Klarna
Where Klarna applies, clients see an "as low as X per month" line on the treatment,
product, cart, and checkout screens.
The figure is the lowest honest monthly figure the amount qualifies for, and it
is set by Klarna per country rather than by you. Switzerland has no Klarna
financing, only pay in 3, so the same treatment quotes a higher monthly figure
for a Swiss clinic than a German one. That is expected, not a fault.
### The web app
Clients using the app in a browser get a language picker on the welcome screen,
and legal links that open in their own language. On a phone, a signed-in client
sees a prompt in your colours a few seconds after landing on Home, inviting them to
install the app. It carries your clinic with it, so after installing they land in
**your** app rather than being asked for a clinic code. It is shown at most three
times, fourteen days apart, and never again once they tap through. It does not
appear on desktop.
## Publish your changes
Your edits in App Builder are **staged**, so clients don't see them until you
publish. When you're ready, publish everything you've changed in one go.
Publishing is **owner-only**. Only the clinic **owner** can publish app changes.
Managers and staff can make edits, but an owner has to push them live.
Update your branding, tabs, navigation, or languages. Each change is saved as a
staged edit, waiting to go live.
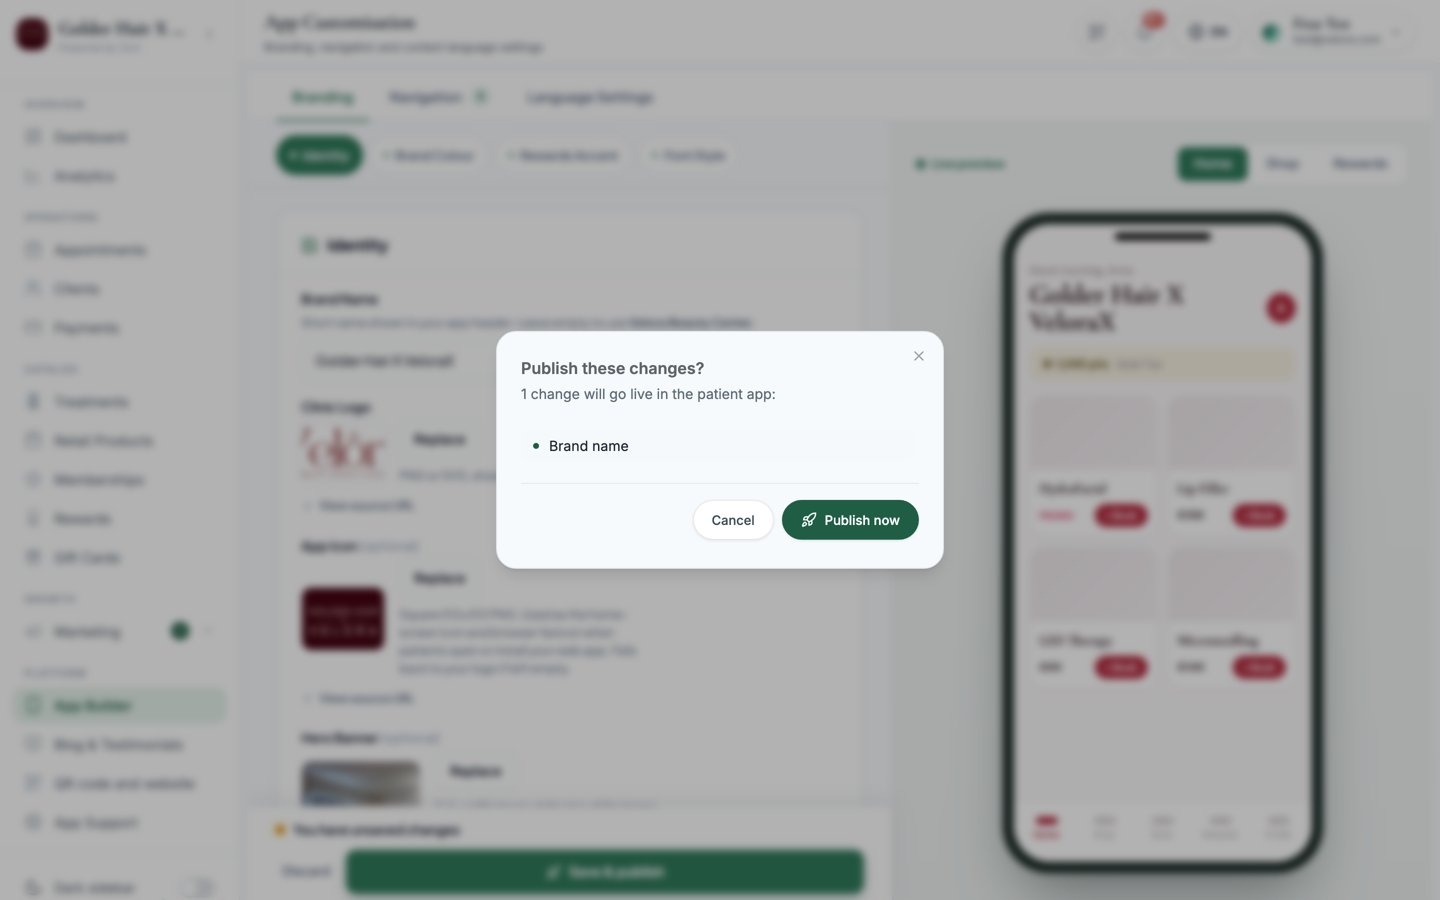
Select **Publish**. A **Publish these changes?** review appears listing
everything that's about to go live, so you can check it first.
Confirm to publish. Your changes reach the client app within about **60
seconds**.
After you publish, clients see your updated app within roughly a minute, with no
app update or reinstall needed.
## What App Builder controls
App Builder configures the app your clients install and open, not the dashboard
you're using. It has four tabs:
| Tab | What you set here |
| --------------------- | ------------------------------------------------- |
| **App Customisation** | Your brand and theme, plus app languages |
| **Treatments** | Which treatments appear and how they're presented |
| **Rewards** | Which rewards clients see |
| **Content** | Which blog articles and testimonials show up |
App Builder also has two full-page sections of its own: **Navigation**, where you
arrange the tabs clients move between, and **Notifications**, where you set the
push messages your app sends.
Skin concerns are no longer edited in App Builder. A concern appears in your app
as soon as a live treatment or retail product is tagged with it. See
[Concerns](/catalog/concerns).
## App Customisation
The **App Customisation** tab is your branding. As you change each field, the
**phone preview** on the side updates so you can see the app the way clients will:
* **Brand name**: the name shown throughout the app.
* **Logo**: your clinic logo.
* **App icon**: the icon clients see on their home screen.
* **Hero banner**: the headline image at the top of the app.
* **Primary color**: your main brand color, applied across the app.
* **Theme**: the overall look, shown live in the phone preview.
Keep an eye on the **phone preview** as you go. It's the fastest way to catch a
logo that's cropped awkwardly or a primary color that clashes before you publish.
## Choose what appears in the app
The **Treatments**, **Rewards**, and **Content** tabs decide what your clients
actually see. The items themselves are created elsewhere. App
Builder is where you choose which of them surface in the app and how they're
ordered.
* **Treatments**: control how your services appear to clients. Manage the
services themselves in [Treatments](/catalog/treatments).
* **Rewards**: choose which rewards clients can see. Build and edit rewards in
[Rewards](/loyalty/rewards).
* **Content**: choose which blog articles and testimonials appear. Create and
manage them in [Blog & testimonials](/content/blog-testimonials).
### Navigation
Use the **Navigation** editor to arrange how clients move around the app: the
sections they land on and the order they appear in. Sections hide themselves when
they have nothing to show, so a clinic with no retail products does not show an
empty Retail tab.
## App languages
Under **App Customisation** you'll find **App languages**. This is how your app
speaks to clients in their own language without you translating everything by
hand.
Turn on each language you want to support. Enabling a language
**auto-translates** your client-facing content into it.
Choose a **default content language**, the one used when a client's language
isn't one you've enabled.
Auto-translation covers your client-facing content so clients see your app in a
language they understand. Set the default to the language most of your clients
use.
## What your clients see
App Builder describes the settings. This is the result, so you know what a client
is actually looking at when they call you about it.
### Home
Your hero banner and brand colors, promo cards (the headline is the tap target,
and the fine print opens in its own dialog), and a closing block inviting them to
ask your [AI Advisor](/advisor/overview) if you have one. Clinics with the advisor
get a sparkles icon in place of search in the header.
### Shop
Shop is organised into tabs, and **each tab hides itself when it has nothing to
show**:
| Tab | Appears when |
| --------------------- | ------------------------------------------- |
| **Just For You** | Your AI Advisor is switched on |
| **Discover** | Always |
| **Browse by Concern** | Always. This is where concerns live in full |
| **Memberships** | You have at least one plan |
| **Treatments** | Always |
| **Retail** | You have retail products in stock |
**Discover** runs in this order: an advisor hero, then **Our Services**, what is
trending at your clinic, your referral programme, wellness reads, real results
from your own before and after work, a gift card banner, a treatment spotlight,
and a limited-time teaser.
**Our Services** is a menu of everything you sell, one row each: memberships,
individual treatments, retail products, rewards, and gift cards. Rows hide
themselves when they are empty, and each one uses your own first available photo
for that service.
### Klarna
Where Klarna applies, clients see an "as low as X per month" line on the treatment,
product, cart, and checkout screens.
The figure is the lowest honest monthly figure the amount qualifies for, and it
is set by Klarna per country rather than by you. Switzerland has no Klarna
financing, only pay in 3, so the same treatment quotes a higher monthly figure
for a Swiss clinic than a German one. That is expected, not a fault.
### The web app
Clients using the app in a browser get a language picker on the welcome screen,
and legal links that open in their own language. On a phone, a signed-in client
sees a prompt in your colours a few seconds after landing on Home, inviting them to
install the app. It carries your clinic with it, so after installing they land in
**your** app rather than being asked for a clinic code. It is shown at most three
times, fourteen days apart, and never again once they tap through. It does not
appear on desktop.
## Publish your changes
Your edits in App Builder are **staged**, so clients don't see them until you
publish. When you're ready, publish everything you've changed in one go.
Publishing is **owner-only**. Only the clinic **owner** can publish app changes.
Managers and staff can make edits, but an owner has to push them live.
Update your branding, tabs, navigation, or languages. Each change is saved as a
staged edit, waiting to go live.
Select **Publish**. A **Publish these changes?** review appears listing
everything that's about to go live, so you can check it first.
Confirm to publish. Your changes reach the client app within about **60
seconds**.
After you publish, clients see your updated app within roughly a minute, with no
app update or reinstall needed.
 ## Related
The assistant clients meet inside the app.
Tag treatments so clients can browse by what they want to address.
Create the articles and reviews that appear in your app.
## Related
The assistant clients meet inside the app.
Tag treatments so clients can browse by what they want to address.
Create the articles and reviews that appear in your app.