> ## Documentation Index
> Fetch the complete documentation index at: https://zovi.mintlify.site/llms.txt
> Use this file to discover all available pages before exploring further.
# Teams: staff & permissions
> Add your team members, set their working hours, manage time off, and control exactly what each person can see and do with roles and permissions.
**Teams** is where you manage the people who work at your clinic. You invite
staff to the dashboard, set their availability, track time off, and control
their permissions. Open **Settings** from the account menu in the top-right, then
select **Teams** (the page title reads *Staff*).
You need the **staff** permission to add or edit team members. Owners see every
location. Managers and staff are pinned to their own branch, and their changes
apply there.
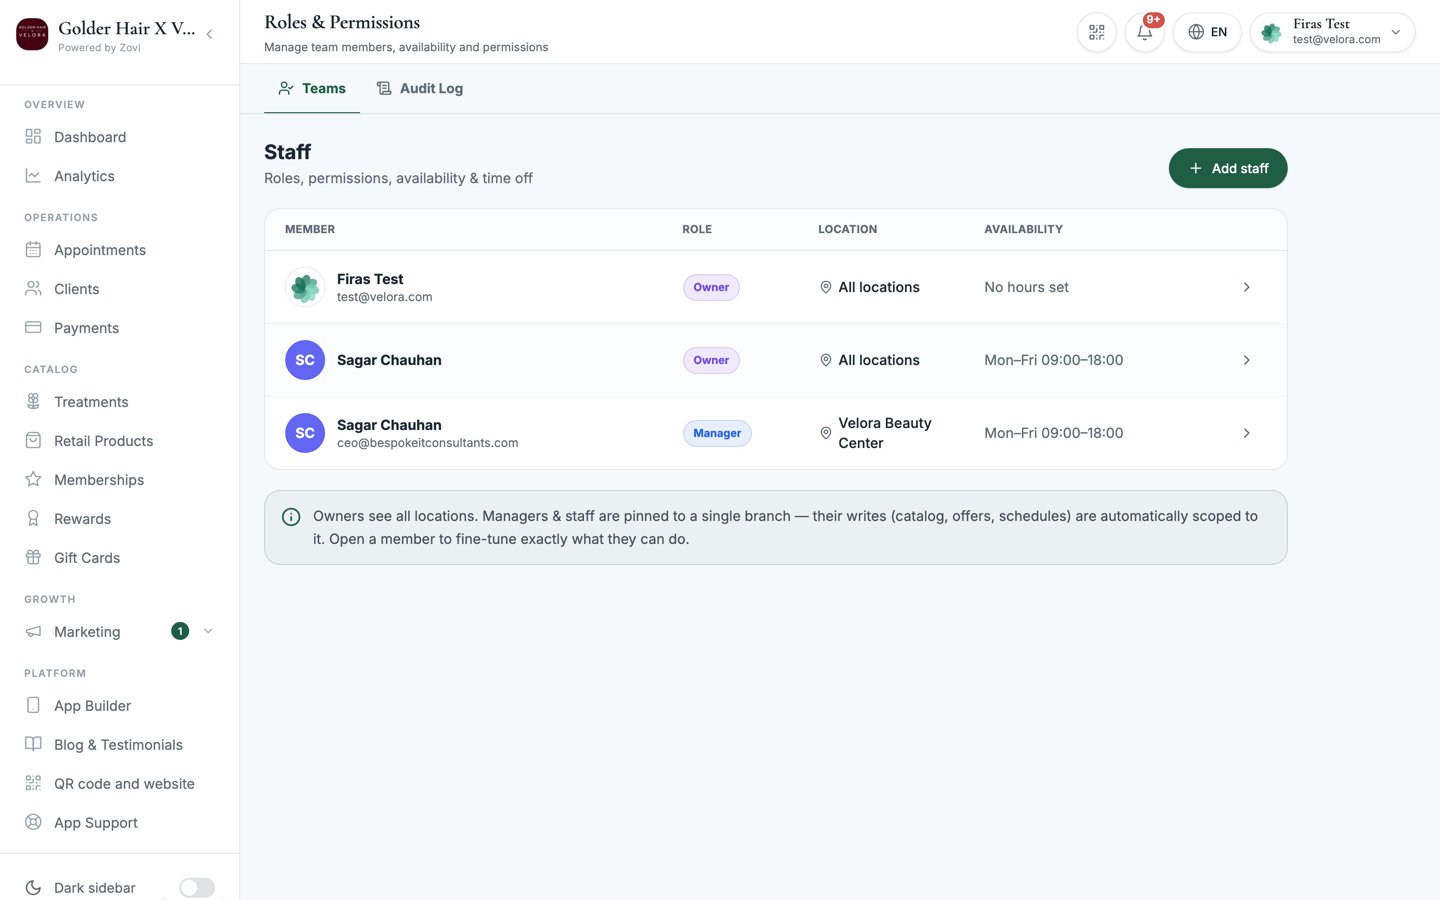 ## The staff list
Everyone on your team appears in a list with these columns:
| Column | What it shows |
| ---------------- | ------------------------------------- |
| **Member** | The person's name. |
| **Role** | Their role: Owner, Manager, or Staff. |
| **Location** | The branch they belong to. |
| **Availability** | Their working hours at a glance. |
Someone who hasn't set up their account yet carries an **Invite pending** badge
next to their name in the **Member** column, or **Invite expired** if their link
has passed its expiry.
Select **Add staff** to add someone new, or select any member to open their
detail with the tabs described below.
## Add a staff member
Open the **Add staff** dialog.
Fill in the fields:
| Field | Notes |
| ----------------- | -------------------------------------------------------------------------------------------------------------------- |
| **Full name** | Required. |
| **Email** | Required. Zovi emails the invite to this address. |
| **Role** | Choose **Manager** or **Staff**. This sets their default permissions. **Owner** is greyed out and can't be selected. |
| **Location** | Required. The branch this person works at. |
| **Working hours** | Set their weekly availability on the hours grid. |
There's one clinic **Owner**, set when the clinic is created. You can invite
a **Manager** or a **Staff** member, never another Owner.
Save to add the person to your team. They appear in the list right away.
Zovi emails the person a secure link to set up their own account, and a
confirmation panel tells you the invite has been sent. The same panel gives
you a **copyable invite link** you can send them yourself if the email doesn't
arrive.
The person chooses their own password when they follow the link. You never
see it, set it, or hand one over.
## Chase an invite
Someone who has been invited but hasn't set up their account yet shows an
**Invite pending** badge in the staff list and on their profile. If their link
has passed its expiry, the badge reads **Invite expired** instead.
Open that person and you'll see a highlighted panel at the top of their profile,
amber for pending and red for expired, with a **Resend invite** button. Selecting
it emails them a fresh invite and gives you a fresh copyable link to pass on.
**Resend invite** is also the fix for an expired link. There's nothing else to
reset: send a new invite and the old link stops mattering.
## The member tabs
Selecting a team member opens their detail, organised into tabs.
### Profile
The person's core details:
* **Name** and **Email**. The email is read-only once set.
* **Role preset**: their role (Owner, Manager, or Staff).
* **Location**: the branch they belong to.
* **Calendar colour**: the colour their appointments show in on the calendar.
* **Dashboard login**: whether they can sign in.
* **Remove staff**: remove the person from your team.
### Availability
The member's **working hours** grid. Set the days and times they're available so
the [booking calendar](/appointments/calendar) only offers slots when they can
actually work.
### Time off
Log and track when the member is away. Each entry has a **type**, a **start** and
**end** date, and an optional **note**.
Time-off types:
* `Holiday`
* `Sick leave`
* `Training`
* `Personal`
* `Unpaid`
Each request shows a status of **Approved** or **Pending**.
Whether time off needs sign-off depends on the **Staff time-off approval**
switch in [Booking settings](/settings/booking). With it on, requests stay
**Pending** until approved before they block the calendar.
### Permissions
Control exactly what this person can see and do.
Start from a **preset**, a segmented control for **Owner**, **Manager**, or
**Staff**, then fine-tune individual toggles. Permissions are grouped into **7
permission groups** of switches:
* **Clients**
* **Bookings & calendar**
* **Catalog**
* **Marketing**
* **Payments & analytics**
* **Staff**
* **Settings & billing**
When you change anything away from the preset, the tab shows a **Customised**
label with the number of toggles you have changed. Use **Reset to preset** to snap
back, and **Save permissions** to apply your changes.
Some abilities are **owner-only** and show as **locked** chips you can't toggle
for managers or staff: managing locations, publishing the app, editing
branding, and managing billing. Only an Owner has these.
The Owner's own account is protected too. A manager with full staff permissions
still can't deactivate the Owner, change the Owner's role, or resend the
Owner's invite. Those attempts are refused and recorded in the audit trail. A
manager with the staff permission can still edit the Owner's name, calendar
colour, location, and photo.
A **Manager's** permissions are automatically **scoped to their branch**. A
scoped toggle reads *"{location} only"*. Their access applies to their own
location, not the whole clinic.
## Roles & permissions
Every team member has one of three roles, which sets their starting permissions.
You then tune each person on their **Permissions** tab.
Full, unrestricted access across all locations, including billing, app
publishing, branding, and locations. Owner-only abilities can't be granted to
anyone else.
Broad access, automatically **scoped to their branch**. Their changes to
catalog, offers, schedules, and settings apply to their location only.
Day-to-day access: clients, bookings, and checking clients in.
The role sets a person's default permissions. The **Permissions** tab lets you
grant or remove individual abilities from there. For how roles shape the whole
dashboard, see the [dashboard tour](/getting-started/dashboard-tour).
## Related
How roles shape what each person sees.
Turn staff time-off approval on or off.
## The staff list
Everyone on your team appears in a list with these columns:
| Column | What it shows |
| ---------------- | ------------------------------------- |
| **Member** | The person's name. |
| **Role** | Their role: Owner, Manager, or Staff. |
| **Location** | The branch they belong to. |
| **Availability** | Their working hours at a glance. |
Someone who hasn't set up their account yet carries an **Invite pending** badge
next to their name in the **Member** column, or **Invite expired** if their link
has passed its expiry.
Select **Add staff** to add someone new, or select any member to open their
detail with the tabs described below.
## Add a staff member
Open the **Add staff** dialog.
Fill in the fields:
| Field | Notes |
| ----------------- | -------------------------------------------------------------------------------------------------------------------- |
| **Full name** | Required. |
| **Email** | Required. Zovi emails the invite to this address. |
| **Role** | Choose **Manager** or **Staff**. This sets their default permissions. **Owner** is greyed out and can't be selected. |
| **Location** | Required. The branch this person works at. |
| **Working hours** | Set their weekly availability on the hours grid. |
There's one clinic **Owner**, set when the clinic is created. You can invite
a **Manager** or a **Staff** member, never another Owner.
Save to add the person to your team. They appear in the list right away.
Zovi emails the person a secure link to set up their own account, and a
confirmation panel tells you the invite has been sent. The same panel gives
you a **copyable invite link** you can send them yourself if the email doesn't
arrive.
The person chooses their own password when they follow the link. You never
see it, set it, or hand one over.
## Chase an invite
Someone who has been invited but hasn't set up their account yet shows an
**Invite pending** badge in the staff list and on their profile. If their link
has passed its expiry, the badge reads **Invite expired** instead.
Open that person and you'll see a highlighted panel at the top of their profile,
amber for pending and red for expired, with a **Resend invite** button. Selecting
it emails them a fresh invite and gives you a fresh copyable link to pass on.
**Resend invite** is also the fix for an expired link. There's nothing else to
reset: send a new invite and the old link stops mattering.
## The member tabs
Selecting a team member opens their detail, organised into tabs.
### Profile
The person's core details:
* **Name** and **Email**. The email is read-only once set.
* **Role preset**: their role (Owner, Manager, or Staff).
* **Location**: the branch they belong to.
* **Calendar colour**: the colour their appointments show in on the calendar.
* **Dashboard login**: whether they can sign in.
* **Remove staff**: remove the person from your team.
### Availability
The member's **working hours** grid. Set the days and times they're available so
the [booking calendar](/appointments/calendar) only offers slots when they can
actually work.
### Time off
Log and track when the member is away. Each entry has a **type**, a **start** and
**end** date, and an optional **note**.
Time-off types:
* `Holiday`
* `Sick leave`
* `Training`
* `Personal`
* `Unpaid`
Each request shows a status of **Approved** or **Pending**.
Whether time off needs sign-off depends on the **Staff time-off approval**
switch in [Booking settings](/settings/booking). With it on, requests stay
**Pending** until approved before they block the calendar.
### Permissions
Control exactly what this person can see and do.
Start from a **preset**, a segmented control for **Owner**, **Manager**, or
**Staff**, then fine-tune individual toggles. Permissions are grouped into **7
permission groups** of switches:
* **Clients**
* **Bookings & calendar**
* **Catalog**
* **Marketing**
* **Payments & analytics**
* **Staff**
* **Settings & billing**
When you change anything away from the preset, the tab shows a **Customised**
label with the number of toggles you have changed. Use **Reset to preset** to snap
back, and **Save permissions** to apply your changes.
Some abilities are **owner-only** and show as **locked** chips you can't toggle
for managers or staff: managing locations, publishing the app, editing
branding, and managing billing. Only an Owner has these.
The Owner's own account is protected too. A manager with full staff permissions
still can't deactivate the Owner, change the Owner's role, or resend the
Owner's invite. Those attempts are refused and recorded in the audit trail. A
manager with the staff permission can still edit the Owner's name, calendar
colour, location, and photo.
A **Manager's** permissions are automatically **scoped to their branch**. A
scoped toggle reads *"{location} only"*. Their access applies to their own
location, not the whole clinic.
## Roles & permissions
Every team member has one of three roles, which sets their starting permissions.
You then tune each person on their **Permissions** tab.
Full, unrestricted access across all locations, including billing, app
publishing, branding, and locations. Owner-only abilities can't be granted to
anyone else.
Broad access, automatically **scoped to their branch**. Their changes to
catalog, offers, schedules, and settings apply to their location only.
Day-to-day access: clients, bookings, and checking clients in.
The role sets a person's default permissions. The **Permissions** tab lets you
grant or remove individual abilities from there. For how roles shape the whole
dashboard, see the [dashboard tour](/getting-started/dashboard-tour).
## Related
How roles shape what each person sees.
Turn staff time-off approval on or off.